SailMail / Virtual Machine
Note: as of October 2020, I can no longer recommend the use of Virtual Box. Two popular virtual machine apps available for the Mac are Parallels and VMWare. One of those should be used instead.
Also note, that Apple has announced its intention to migrate its Mac line of computers over to Apple Silicon, a family of CPUs based on the ARM instruction set. This will happen slowly, over a number of years. It is expected that these new machines will be highly desirable (fast and with long battery life.) However it is not clear if the new machines will be able to run windows software using virtual machines. In general, the approach of relying of the use of a virtual machine to deliver weather data should be considered fragile. If you are able to directly download data from the LuckGrib server cluster, using one of the direct download options, then you are strongly encouraged to do so.
The remainder of this article is left as a historical reference, it may be useful as a general principal on how to set up a virtual machine.
This example assumes you will be using VirtualBox, the free virtual machine from Oracle.
Also, it appears that Microsoft now allows you to download Windows 10 for free, although they encourage you to pay for, and activate the operating system at some point. I will use the Home version of Windows 10 in this example.
These steps will be similar regardless of which virtual machine software you are using, small details may change, but the principles should remain the same. The steps are:
- find a good reference for how to install Windows in your selected virtual machine.
- download the Windows installation image
- download the VirtualBox (or some other virtual machine) software.
- create a new virtual machine to host Windows
- adjust the virtual machines display, if running on a Retina display
- install Windows inside of the virtual machine.
There are several large downloads required for this process. You will want access to high speed, hopefully free, internet.
Step 1 - find a good reference
This is an easy step. Use your favorite search engine and use a search term like:
Choose one of the guides and read through it, to become familar with how this process works. Having done that, come back here and read on. This guide contains a few essential details required for LuckGrib to work properly.
Step 2 - download the Windows 10 installation image
You need to download Windows 10 from Microsoft. I recommend only downloads directly from Microsoft, in order to ensure what you are installing is genuine.
This link may lead to a download page. If not, use your favorite search engine to search for: “Windows 10 iso image”
On the download page, choose the most recent version of Windows 10, choose your language, and then choose the 64 bit download. The download is roughly 5 GB.
Step 3 - download and install the VirtualBox software
You can download VirtualBox from:
This example will use version 6.0.8, although you should use whatever the latest version is.
After the software is downloaded, double click on the disk image in the Downloads folder. That will lead to this window:
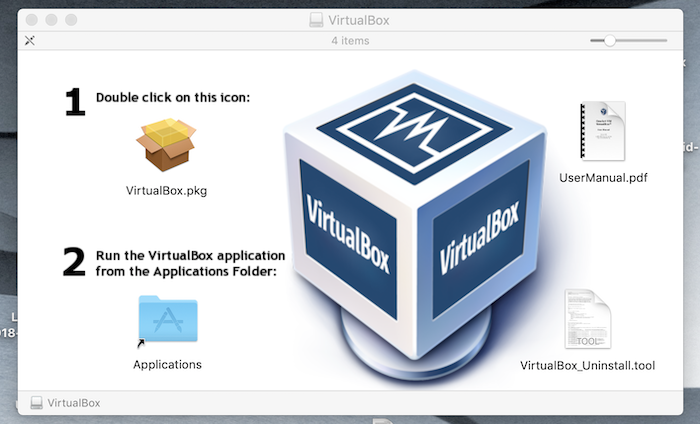
Follow the instructions. Double click on the icon. Run the application.
Step 4 - create a new virtual machine to host Windows
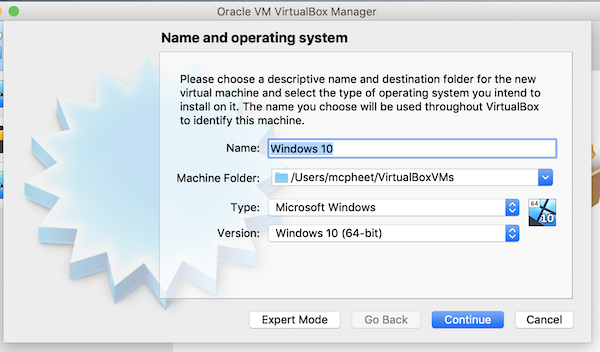
Open VirtualBox and click on the New button to create a new virtual machine:

Give the new virtual machine a name. Something like “Windows 10”. Choose the operating system type and version.
Press continue. I used all of the default values suggested for the remaining screens, although I gave the virtual machine more memory than the default - I gave it 3GB (3036 MB.) Eventually the virtual machine is created and you return to the VirtualBox settings screen.
Step 5 - arrange port forwarding from the Mac into Windows
In order for LuckGrib to communicate with Airmail running in Windows, we need to arrange that a network connection to a specific port on the Mac will be forwarded to Windows running inside of a virtual machine.
To do setup port forwarding, click on: Settings, then click on Network, and then toward the bottom of the network screen, click on Advanced.
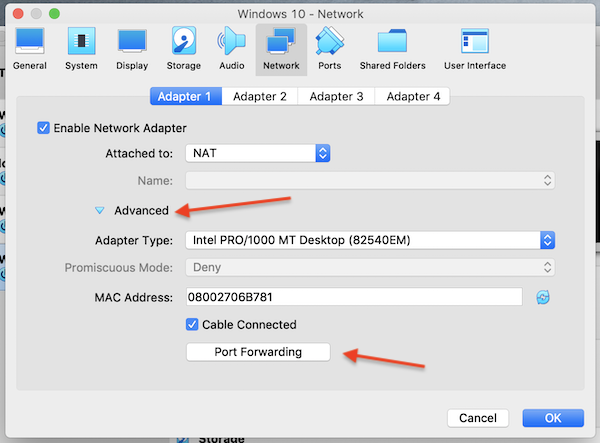
You will then see the screen above.
Now comes some of the magic. In order to allow the Airmail program to be found by LuckGrib, on your Mac or iOS device, you need to create two rules which will forward connections made to the host (your Mac) into the virtual machine.
There are two important ports we need. One port for the SMTP connection, and one port for the POP3 connection. I’ll use 6625 for SMTP, and 6610 for POP3.
In the Advanced screen shown above, click on Port Forwarding. Now we’ll add the two rules required.
Click on the Plus icon, to the right of this screen. This will create a row in the table. Fill it in as shown below. Click on the Plus icon again and fill in the second row. The screen should look like this:
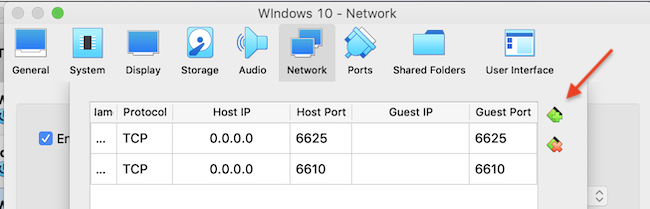
What this is saying, is: when some network software connects to the host (the Mac) from any network (which is what 0.0.0.0 indicates) on port 6625, then forward that connection to this virtual machine on port 6625. Similarily for port 6610 forwarding to port 6610.
By using the magic 0.0.0.0 network address, these rules will allow access from both LuckGrib running on this Mac as well as any iOS device connecting to this Mac.
(Note, if you are using Parallels rather than VirtualBox, look here for a guide on how to setup port forwarding.)
Step 6 - adjust the virtual machines display, if running on a Retina display
If you are running on a Mac with a Retina display, as most modern Mac’s have, you will need to adjust a display setting in the virtual machine’s Display area. If you don’t do this, the virtual machine will show all if its screens with teensy weensy fonts. If you forget to do this, you can come back and do it anytime.
To perform this step, move to the Display area of the VirtualBox settings for the new virtual machine. Change the Scale Factor to 200%.
Step 7 - install Windows inside of the virtual machine.
With the Windows 10 virtual machine selected, click on the Start button in the toolbar. You now need to select the Windows 10 ISO file you downloaded earlier. Click on the little folder icon to the right and navigate to your Downloads folder and choose the ISO image.
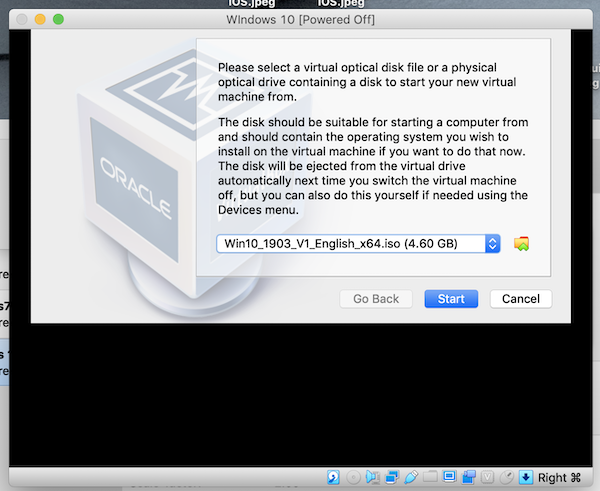
Click the Start button and follow through the Microsoft installation process.
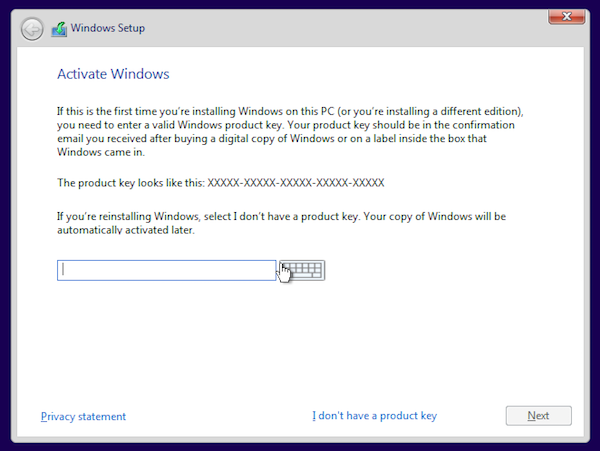
You will be asked for your activation key. Click on a button at the bottom of that window labelled I don’t have a product key. (You should get one later.)
When asked, I choose Windows 10 Home for my installation.
When given a choice, I choose a custom install as the other option was an upgrade and this is not an upgrade (the virtual machine is empty.)
When given the choice, I choose to sign in with an offline account.
I turned off all the privacy settings, opting to have Windows not send any data out.
After a little patience and a few more clicks, you have a working copy of Windows 10! Yay!
From what I understand, this copy of Windows is licensed to you with the intention that you eventually purchase a copy. It may also be that if you own a prior copy of Windows that it can be used as an upgrade option. You’re on your own to pursue this. As a software developer, I encourage people to use their software legally.
Also note that if its Microsofts intention that you should pay for their operating system (which is perfectly reasonable,) they could issue an update at any time which would find unlicensed copies of the OS. If you are relying on this for your safety at sea, you may want to consider this.