iOS / SMTP
This guide will be useful if you are running LuckGrib on an iOS device, with XGate running on a different computer. This is more complex than the case were XGate is running on iOS directly, and if possible, you are encouraged to use the XGate app which is available for iOS.
There are a number of steps to make this work.
- establish a WiFi network. Connect your iPhone/iPad to the network along with the computer running XGate.
- ensure the XGate application settings are correct for our needs.
- have LuckGrib send its email requests directly to XGate on the remote machine.
- send and receive mail using XGate in the normal way.
- retrieve the weather data from the newly received email, using the LuckGrib POP3 interface.
These steps are described in more detail.
Establishing a WiFi network - travel router
In order to make this scenario work, we want LuckGrib on one device to talk to an email program on a different device. In order for the devices to be able to talk to each other they must be connected to the same WiFi network.
This is typically easy when you are on shore, as normally all of our devices are on the network all the time.
However, the problem we want to solve is to make this work while we are out in the middle of nowhere, on a boat far from shore. Imagine you are using an iPad to study the weather and have access to XGate running on a computer. In order for your iPad to be able to communicate with your computer, they both need to be on the same WiFi network. The first step in this process will be to create a WiFi network for them to share.
One way of doing this would be to purchase a travel router. These routers are typically small, power efficient, and inexpensive. If you buy one that is powered via a USB connection, then providing it power will be easy onboard a sailboat.
One source for Travel Routers is through Amazon. Try searching for something like “USB powered travel router”
You will want to work through this process while you have easy access to retail outlets (such as Amazon) and are also able to use the powers of the internet to research different solutions.
Once you have a router, follow its instructions to set it up. There will be no need for the router to access a network itself - the purpose of the router will be for it to provide a network to share.
Once the router is plugged in and turned on, connect the devices to the network it is providing. These devices are now able to talk to each other.
Note: if you simply want to test the Offshore service, you can skip this step. If both devices you are testing are connected to the same network, that is sufficient.
Thanks to: Thank you to David Burch for being the first to let me know about this technique for exchanging files while offshore.
WiFi network - IP Addresses
Once a WiFi network has been established and the two devices you want to be able to talk to each other are sharing the network, there is one remaining step required before you can configure LuckGrib to use XGate: you need to know the IP address of the computer so that the client can find it.
In this scenario, there are two devices involved (although there could be more.)
- the server. This is the machine which is running the mail application you are trying to access. This could be a Mac running XGate.
- the client. This is where the email request is coming from. One example of a client is an iOS device that you are using to study the weather while obtaining the data through another computer.
When leaving for a offshore passage, when working this way, you will probably want to switch the server to use a static IP address. This means that its IP address will be static, and you will not need to update the address in LuckGrib running on the iPad each time they both connect to the shared network.
To access this setting:
- first, open the macOS System Preferences
- open the Network settings
- click on Advanced
- click on the TCP/IP tab
At this point, you will see a window something like the following:
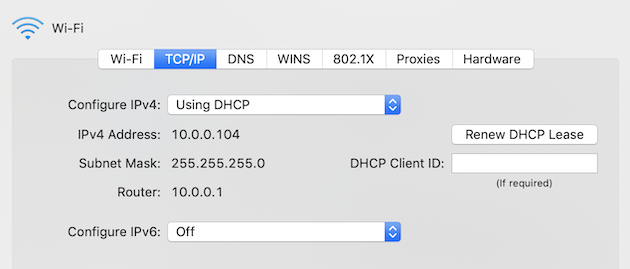
Make a note of the IP address, which in this case, is 10.0.0.104.
Note: if you are simply testing the Offshore service and do not have a travel router, as described above, then you do not need to switch to static IP addressing. Simply use the IP address showing in the Network settings, as shown above.
To continue configuring the static IP address for the travel router, switch the Configure IPv4 option to the setting: Manually
Now you need to choose a static IP address for this machine. Use the first three numbers from the IP address noted above (which in this example was 10.0.0), and then for the last number, choose something like 50.
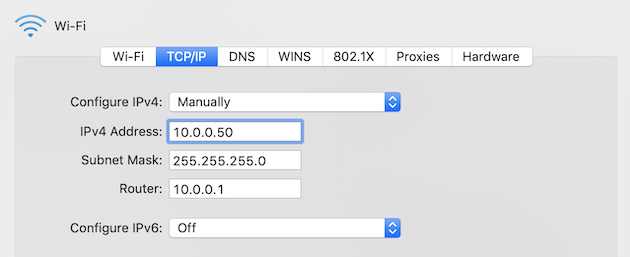
Accept these settings and continue.
Configure XGate as required
There is one setting that must be set in XGate running on the remote computer. Open XGate and then open its Settings… window:
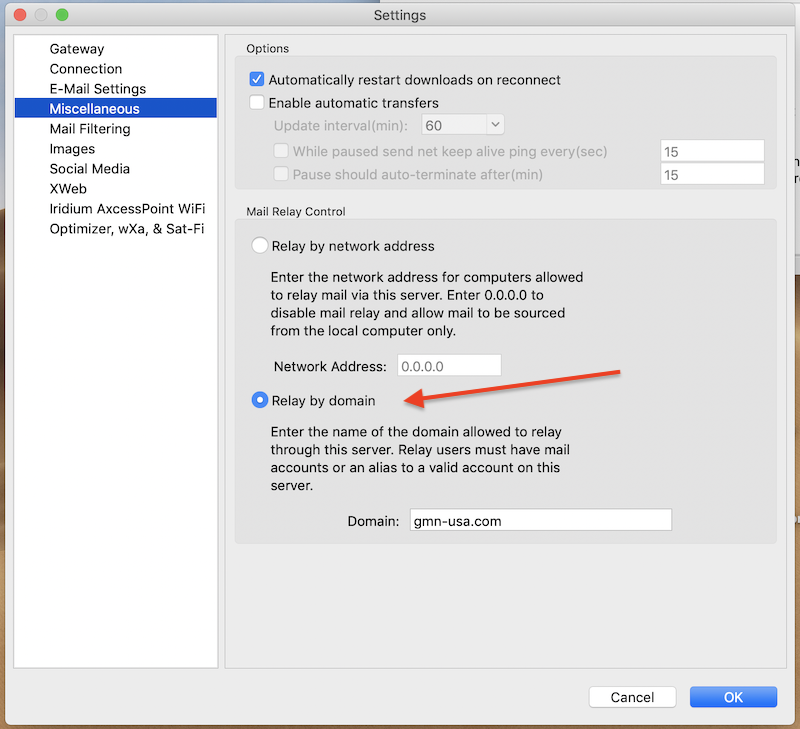
The Relay by domain option must be turned on in order for XGate to accept email messages from other devices. This must be turned on in order for XGate to accept the LuckGrib messages.
Configure LuckGrib to use the XGate SMTP / POP3 interface
Open LuckGrib on the iOS device. Then open the Library / Settings area, and tap on the Download Method row. Tap on the Email download method, scroll down, and then tap on the XGate client. Again, scroll down.
You can now fill in the XGate mail account, password and the IP address.
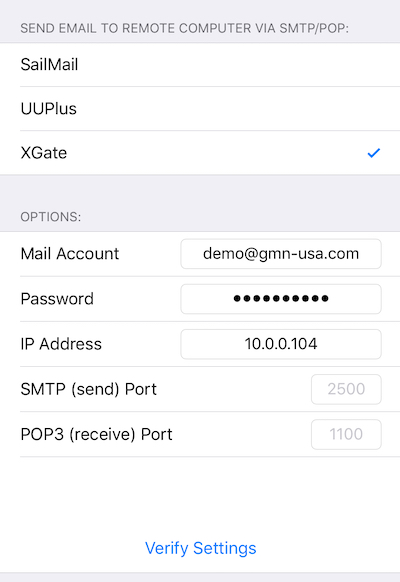
Ensure that XGate is running on the remote machine, and then tap the Verify Settings button to verify that the connection works.
You can now send email directly from your iOS device to XGate running on a Mac or Windows machine.
After setting up, and verifying, the XGate settings, when you send email from LuckGrib to XGate the email request shows up directly in the XGate mail queue, on the remote machine.
You would then use XGate to send/receive email, in the standard manner.
It is also possible for LuckGrib to retrieve newly received weather data when a new email message arrives. This is done using the POP3 protocol. However, this will only work if its done immediately after receiving new mail in XGate, and before running iScribe (or Thunderbird) on the remote machine. When you run iScribe, it will read all the mail from XGate and then delete it from the queue, so if you run LuckGrib after iScribe there will be no mail for it to retrieve. (LuckGrib does not delete the email, so iScribe can be run after importing data into LuckGrib.)
To have LuckGrib retrieve newly received weather data, tap on the Import data from XGate button. That will bring up an Import email window which presents you with a list of weather files that were found:
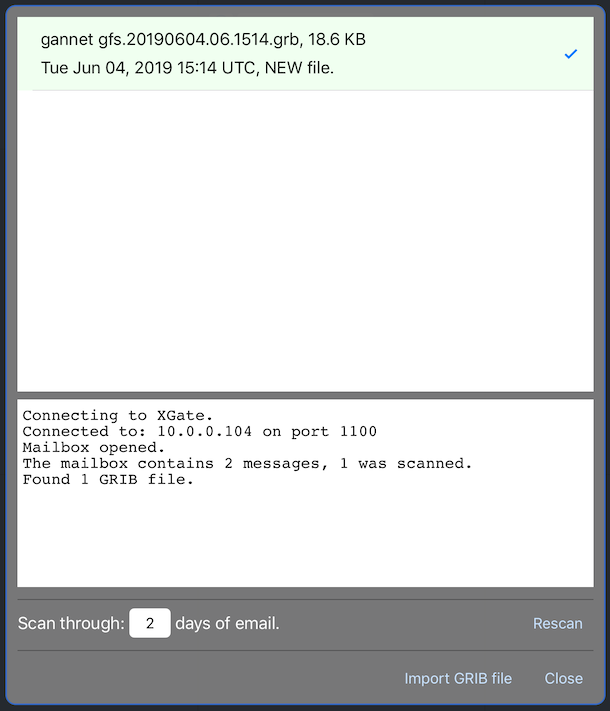
Click on the Import GRIB file button to import the file and finish this process.
(You can import files from a remote XGate whenever you want. To do this, open the Files area of the Library, tap the New File button, and then tap the Import from XGate choice.)